Password protecting an Excel document is a crucial security measure taken to protect the integrity of an Excel spreadsheet, though we see that this can also be a nuisance if you are trying to “Open” or “Modify” an Excel file. This article will provide a helpful guide to removing password protection from Excel. At the end of this article, you will have successfully learned how to remove password protection from an Excel spreadsheet, and you will be able to easily open and modify your Excel Work without a worry in the world!
Removal of a Known Password from an Excel Workbook
Removing a known password is intuitively easy. Just follow the following simple set of instructions to remove the opening or modifying restrictions and have full access to your excel file.
Removing the Opening Restriction
The following steps will help you get rid of the password required for opening the document.
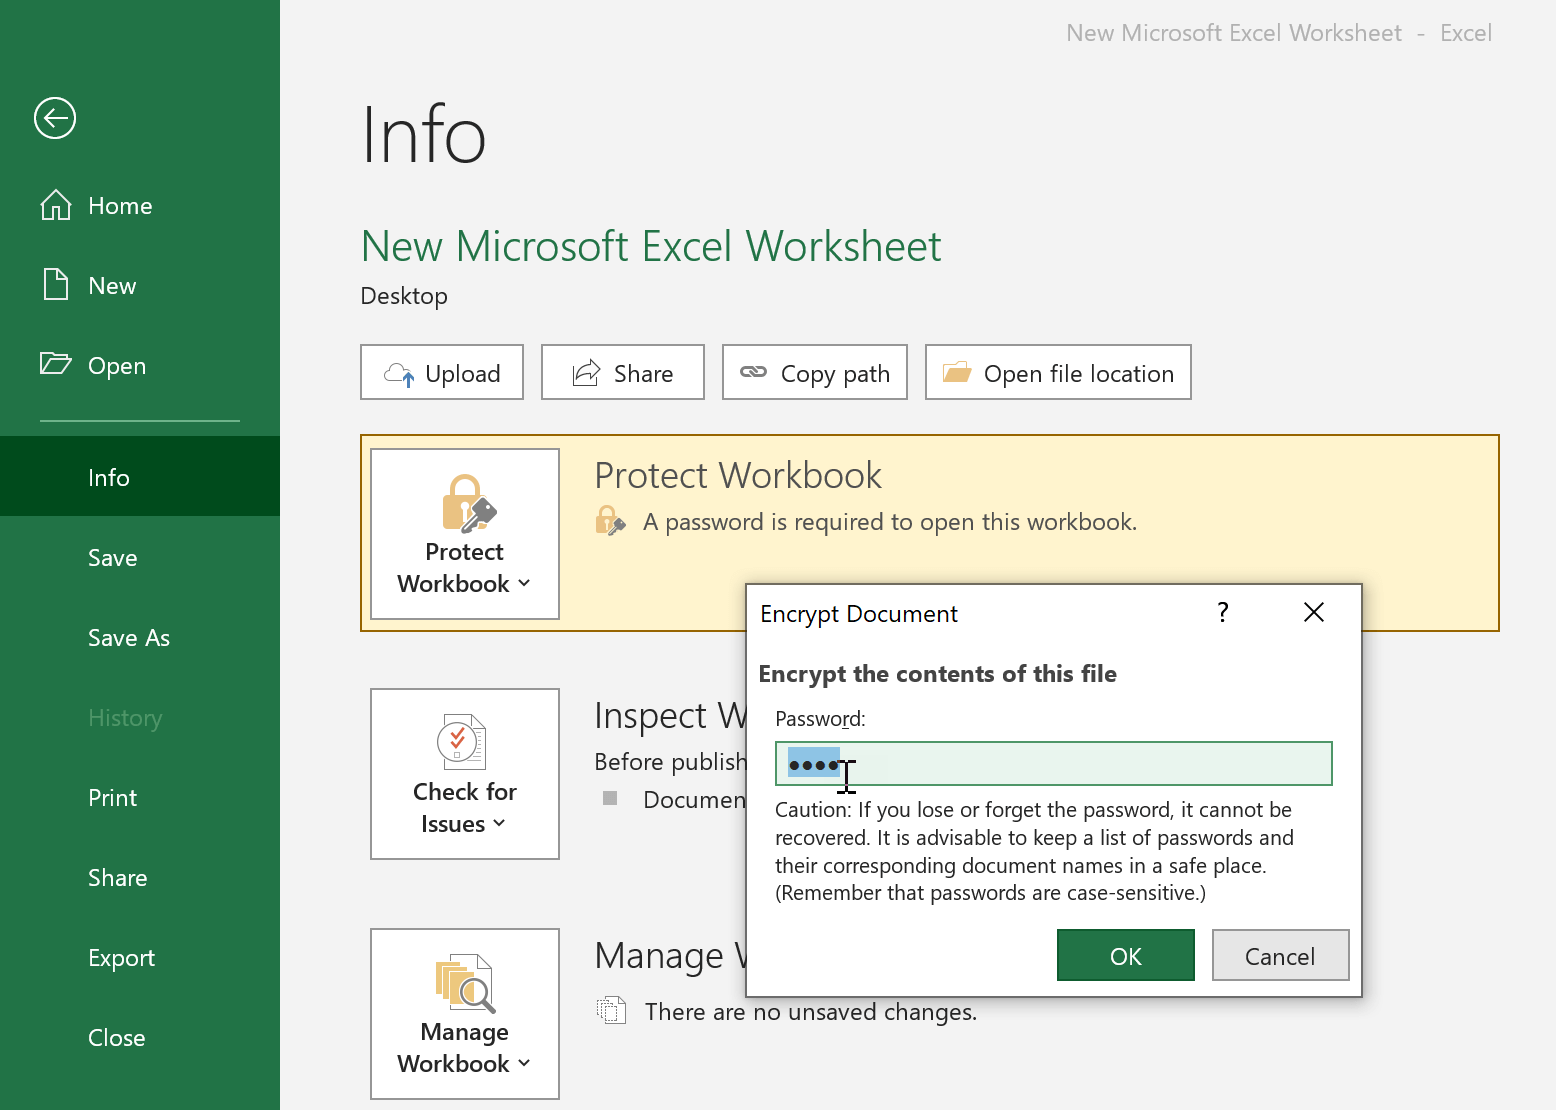
Step 1: Open the file by entering its password and then go to “File” > “Info” > “Protect Workbook”.
Step 2: Select “Encrypt with Password”. A small window will pop up with the asterisked password displayed. Simply clear out any characters in the password box and click on “OK”.
Step 3: Remember to “Save” to file to implement the change.
Your document will no longer be password protected from now onwards!
Removing the Modifying Restriction
You may run into an issue if the Excel Spreadsheet you want to change has been Editing-Restricted, removing this restriction is a very simple procedure if you are already aware of the Password.
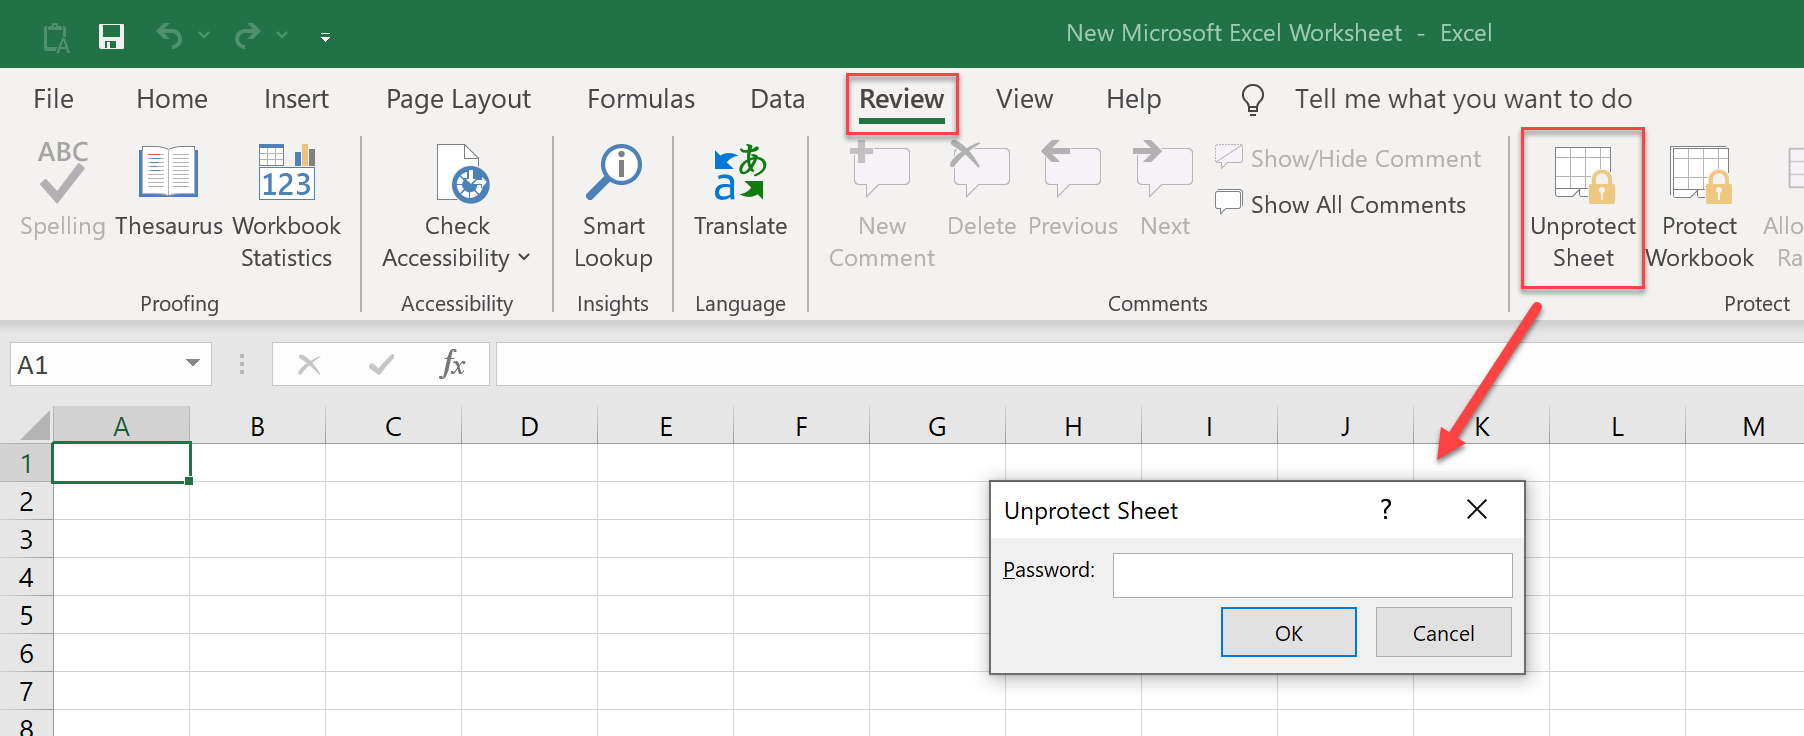
Step 1: Open the relevant Excel file and select the “Review” tab.
Step 2: Click the “Unprotect Sheet” option in the “Changes” section. A small window will pop up with the asterisked password displayed. Simply clear out any characters in the password box and click on “OK”.
Step 3: “Save” the file and your sheet will be successfully unprotected and ready to be modified!
Removal of an Unknown Password from an Excel Workbook
Passwords can be tricky business, especially when you have to remember multiple codes that apply to different files. This means that keeping track of various Passwords can be very cumbersome at times. In this specific case, there is no officially integrated way to remove password from Excel workbook. This is where incredibly helpful external tools like Passper Excel Password Recovery come in.
Passper provides a wide variety of features that will greatly aid you in bypassing an Excel sheets Password. These features include:
- Removal of the modifying password.
- Identifying and removing the opening password.
- Complete reliability and efficiency.
Removing the Opening Restriction
After installation of the program, follow the given steps to remove password from Excel spreadsheet:
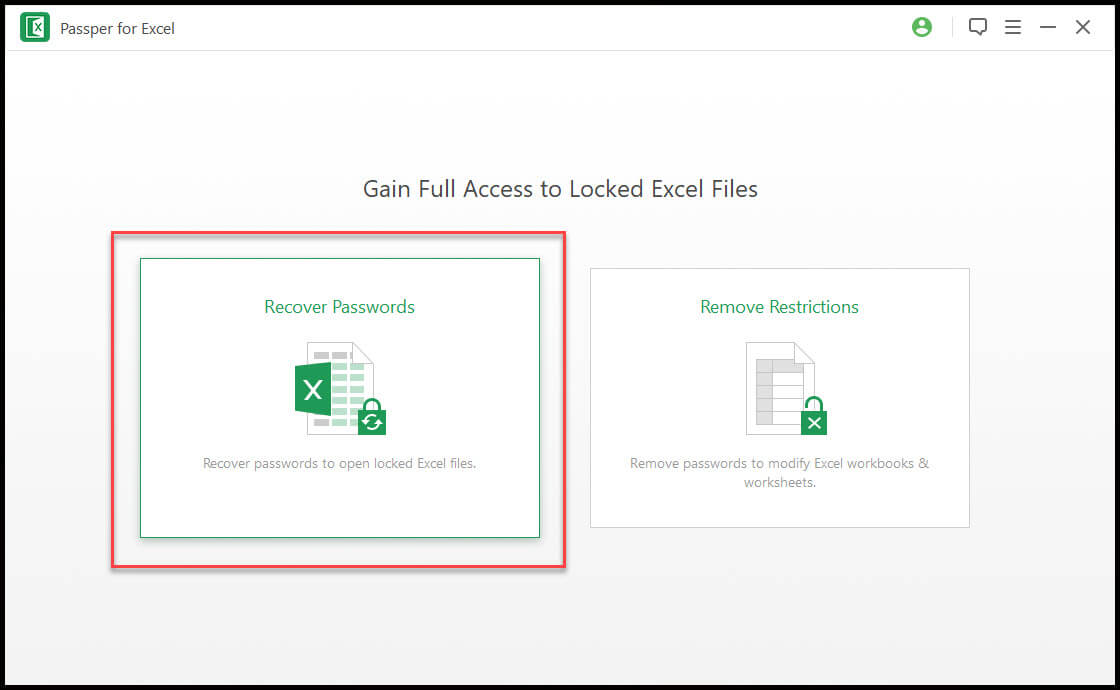
Step 1: Open Passper for Excel on your PC and you will see two options available to you. Select “Recover Passwords” on this main menu screen.
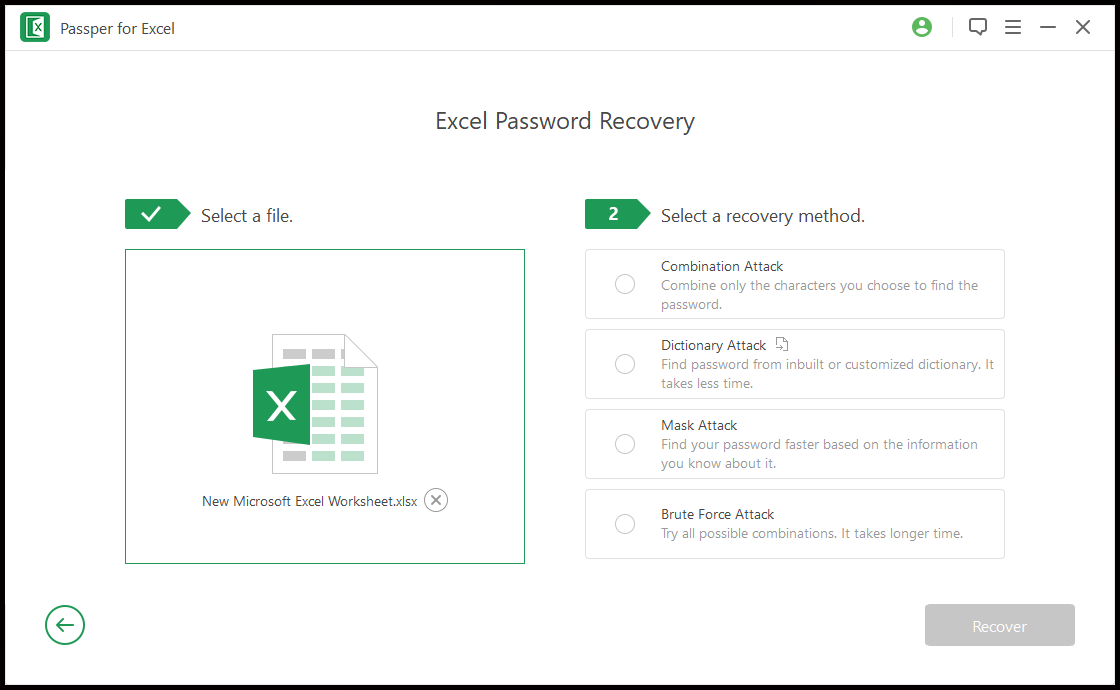
Step 2: Go to the “+” button and press it to load the relevant Excel workbook. After this, you will be able to choose from a variety of attack modes that are tailored to apply to your specific scenario. Click on “Recover” when you have chosen an attack mode that suits you best.
Passper will initiate the process of retrieving your password after you have pressed “Recover”. It should be noted that the retrieval time is dependent upon the complexity of your password, and the attack mode that you have selected.
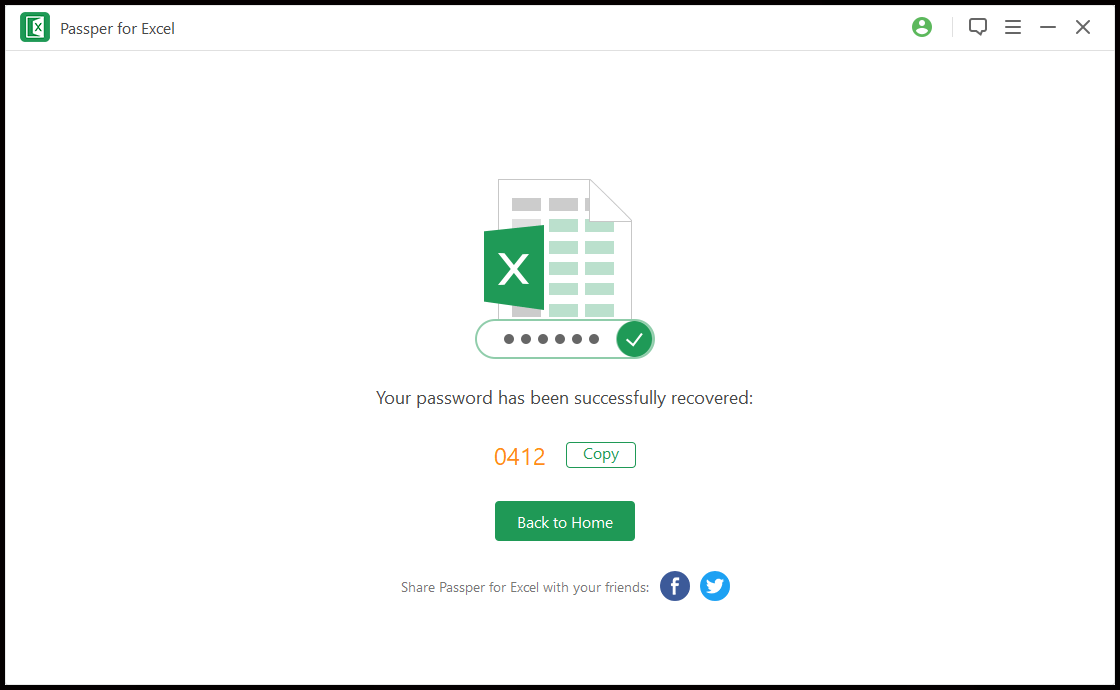
After successful recovery of the password, it will be displayed for you to copy and save. You can use the newly acquired password to remove the protections from your Excel file, you will have to look at the “Remove Password When it is known” section to see how to access your spreadsheet after password retrieval.
Removing the Modifying Restriction
If an Excel sheet’s editing capabilities have been restricted in any way, it can create a huge challenge if you have been given the responsibility to edit and customize the relevant file. Again, we see that Passper for Excel provides the ideal tool to get rid of any editing restrictions and let you edit your file to your heart’s content!
Just follow the given steps:
Step 1: Launch Passper for Excel after you have installed it. On the main screen, select “Remove Restrictions” from the two available options.

Step 2: Now press the “+” icon and select the Excel file you want to remove restrictions from. Press “Remove” to get rid of all editing restrictions.

After completion, the password that was restricting the editing of your document will be successfully removed, this will mean that your file will be fully customizable and without any annoying roadblocks!
Conclusion
So we see that the question, “how to remove password from excel”, is answered here quite comprehensively. Dealing with password-protected Excel sheets can be a cumbersome business, we hope that the tutorial provided above will make it an easy experience.
It is clear that Passper for Excel greatly facilitates your Excel experience by making otherwise complex tasks into easy “Click and Go” solutions.
Free Download